|
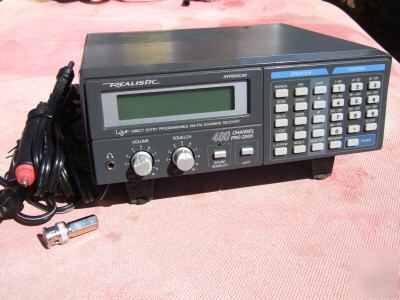
Features Liquid Crystal Display-shows the channel and the frequency you have selected, as well as other information. Two-Second Scan Delay-helps to prevent your losing replies on a channel while you are scanning. Memory Back-up-keeps the channel frequencies stored in your scanner's memory if a power failure occurs. Lock-Out Function-lets your scanner skip over a specified channel or group of channels. Ten Channel Storage Banks-allow you to group your stored frequencies so that calls are easier to identify. Priority Channel-helps to keep you from missing important calls on the selected channel. Direct Frequency Search-allows you to scan through every available frequency to find interesting broadcasts Monitor Banks-allow you to save up to ten additional channels located during a frequency search. Sound Squelch-keeps the scanner from stopping on a channel that is only broadcasting a carrier, with no voice or other sound. Your PRO 2006 scanner covers a wide frequency range: *..............25-520 MHz *.........760-823.945 MHz *.........851-868.945 MHz *............896-1300 MHz PROGRAMMING THE PRO-2006 SCANNER 1. Select a channel to program by pressing [MANUAL], and entering the channel number you want to program. Then, press [PROGRAM]. "PROGRAM" appears in the display to indicate that your scanner is in the 2. Enter a frequency. Good references for active frequencies are Radio Shack's "Police Call Guide Including Fire and Emergency Services,""Official Aeronautical Frequency Directory", and "Maritime Frequency Directory". We update these directories every year, so be 3. Press [ENTER] to store the frequency. If you make a mistake in Step 2, ERROR appears on the display and three beeps sound. Press [CLEAR] and 4. Press [DELAY]. If you want your scanner to pause after each transmission before scanning to the next channel, press [DELAY]. "DELAY" appears in the display. If you do not want your scanner to pause, press [DELAY] again. "DELAY" disappears from the display. 5. To program more channels, repeat Steps 1-4. If you want to program the next channel in sequence, just press [PROGRAM} and proceed to Step SEARCHING FOR AND TEMPORARILY STORING ACTIVE FREQUENCIES If you do not have a reference to frequencies in your area, use these procedures to search for a transmission. See also "A Guide to the The limit search procedure allows you to search within a range of frequencies. You can store up to ten limit search ranges in the search 1. Press [PROGRAM], and the search bank number in which you wish to store the limit search range. Press [0] for bank number 10. 2. Press [LIMIT]. "L" and the search bank number appears in the display. 3. Enter the lower limit of the frequency range. Press [ENTER]. 4. Press [LIMIT]. "L" changes to "H" in the display. 5. Enter the upper limit of the frequency range. Then, press [ENTER]. 6. Repeat steps 1-5 to store the limit search range into the search banks. You can store up to 10 limit-search ranges. 7. To recall a limit-search range, press the appropriate bank number. 8. Press [UP-ARROW] to search from the upper limit down to the lower limit. Or, press [UP-ARROW] to search upward starting from the lower 9. When the scanner stops on a transmission, press [MONITOR] to store the frequency in the current monitor memory. The memory number flashing on the display indicates the current monitor memory. 10. Press [UP-ARROW] or [DOWN-ARROW] to continue the search. NOTES: Press [SPEED] to speed up or slow down the search. Press [DELAY] to make the scanner pause 2 seconds after a transmission, before proceeding to the next frequency. When you change your scanner's mode from limit search to manual, program, scan, direct search, and so on, your scanner retains the last frequency before you change the mode. Your scanner resumes the search from that frequency when you change the mode to limit search again. NOTE: You can change the upper or lower limit frequency without afecting the memorized frequency if the frequency is within the new limit range. If the frequency is out of the new limit range, the search starts from the new upper or lower limit frequency. 1. Select a currently programmed channel by pressing [MANUAL], and the channel number. Then, press either [MANUAL] or [PROGRAM]. 2. Press [DIRECT]. The step frequency appears in the display. 3. Press [UP-ARROW] to search through higher frequencies or press [DOWN- ARROW] to search through lower frequencies. 4. When the search stops on a transmission, press [MONITOR] to store that frequency in the current monitor memory. The memory number flashing on the display indicates the current memory number. To continue the search, press [DOWN-ARROW] or [UP-ARROW]. NOTES: When you press [DIRECT] during limit, your scanner enters direct When you press a numeric key during a direct search, your scanner changes to limit search mode. The key you press corresponds with MOVING A FREQUENCY FROM A MONITOR MEMORY TO A CHANNEL As you store frequencies in monitor memories, the memory number flashing on the display shows the current monitor memory. You can listen to monitor memories by press [MANUAL], [MONITOR], then the number of the monitor If there is a frequency you wish to transfer to a channel, follow these steps to move it from a monitor memory 1. Press [MANUAL]. Enter the channel number you want to store the monitor frequency in; then press [PROGRAM]. 2. Press [MONITOR] and enter the monitor memory number that has the 3. Press [ENTER]. The scanner stores the monitor frequency in the If you want to return to a limit search after this procedure, press [LIMIT], and the search bank number. Then, press either [UP-ARROW] or [DOWN-ARROW] to continue searching. The scanner's display might lock up the first time you plug in and turn on your scanner, or if the battery is left out for an extended period of time. If the display locks, use a pointed object, like a paper clip, to press and release the restart switch while power is on. To clear all the memories, be sure the scanner is turned on and: 2. Using a pointed object, press and release the restart switch. 3. After confirming that the display goes blank, release [CLEAR]. SETTING THE VOLUME AND SQUELCH Follow these steps to set the volume and squelch. 1. Turn VOLUME clockwise and SQUELCH counterclockwise until you hear a 2. Adjust VOLUME to a comfortable sound level. 3. Slowly rotate SQUELCH clockwise until the hissing stops. NOTE: If the scanner picks up unwanted, partial, or very weak transmissions, rotate SQUELCH clockwise to decrease the scanner's USING THE SOUND SQUELCH SWITCH If the scanner stops at a transmission during scan, search, or priority modes, the [SOUND SQUELCH] switch lets the scanner start scanning again if the transmission contains no sound (carrier only without modulated If you scanner stops at a frequency that has no sound, press [SOUND SQUELCH]. The indicator lights. If the scanner detects no sound within 0.5 seconds, it goes to the next transmission. When the scanner receives a frequency that contains sound, it halts at the frequency. If the sound ceases, the scanner stays on the frequency for 5 seconds, and then resumes scanning. If the carrier stops, the scanner begins to scan immediately if the delay function is off, or after 2 seconds To cancel sound squelch, press [SOUND SQUELCH] again. The indicator goes NOTE: If a frequency contains a transmission with low modulation, the sound squelch circuit might not work properly. To begin scanning the channels, just press [SCAN]. Your scanner scans through all the channels that you have not locked out of the banks that are turned on. Set SQUELCH so that you do not hear hissing sounds between Be sure to read the following sections to get the full benefits from all of your scanner's special features. Many agencies use a two-way radio system that might have a pause of several seconds between a query and a reply. To program a delay into that channel to keep from missing a reply, select the channel and press [DELAY] so DELAY appears on the display. When your scanner pauses at an active channel which has been programmed with a delay, while scanning, it waits for 2 seconds after the completion of each transmission on that channel before it resumes scanning. Some radio systems, especially those above 800 MHz, use a special "trunked" system. In these systems, the transmitter selects an available frequency each time the operator keys the radio. Therefore, it is possible for the query to be on one frequency and the reply on another. To ensure the best possibility of hearing the full reply, you want the scanner to begin scanning immediately when the first transmission ends. In this case, select the channel manually and ensure that "DELAY" is not in the display. If "DELAY" is indicated, press [DELAY] to turn off this feature for that While you are in scan or search mode, you can press [SPEED] to select The scanner has 2 different scanning speeds: You can increase the effective scanning speed by locking out specfic channels that you have not yet programmed. Manually select the empty channel and press [L/OUT] so that "LOCK OUT" appears on the display. This is also handy for locking out channels you have programmed that have a continuous transmission. You can still manually select locked-out To unlock a channel, manually select the channel and press [L/OUT], Or, press [L/OUT RVW] in manual or program mode to call out locked-out channels one by one. Then, press [L/OUT] again. NOTE: There must be at least one active channel in each bank. You cannot As explained in "Understanding Channel Storage Banks and Search Banks" your scanner splits the 400 channels into ten banks of forty channels each. The small bars under the numbers at the top of the display are the bank indicators. You can turn each bank on and off, so that all the channels in a bank are either scanned or locked out. In scan mode, press the number key for the bank you want to turn on or off. If the bank indicator is on, you have turned on the bank and the scanner scans all the channels within that bank that you have not locked out. If the indicator is off, the scanner does not scan any of the channels within that bank. You can still manually select any channel in a bank, even if you have turned off the bank. You cannot turn off all banks - one must be turned on. You can scan through the programmed channels, and still not miss an important or interesting call on a specific channel. To program a stored channel as the priority channel, press [PRI] during scanning. The scanner now checks the priority channel every two seconds, and stays on the channel To turn on the priority feature, press [PROGRAM] and the desired channel number. Then press [PRI]. "P" appears on the display whenever the scanner is set to the priority channel. You can only program one channel as the priority channel. If you program a new channel as the priority channel, the previous channel you chose is automatically cleared. To turn off the priority feature, press [PRI] until "P" disappears from the NOTE: Channel 1 is automatically designated as the priority channel the first time you turn on your scanner. You can continuously monitor a specific channel without scanning. This is useful if you hear an emergency broadcast on a channel and do not want to miss any details-even though there might be periods of silence-or if you want to monitor only a locked-out channel. Follow these steps to manually select a channel. Or, if the scanner is scanning and stops at the desired channel, press MANUAL one time. (Pressing MANUAL additional times causes the scanner to Press [DIMMER] to turn the display's backlight down or up. Programmable Scanner REALISTIC PRO 2006. ...........................................................25 MHz -520 MHz .....................................................760 MHz - 823.945 MHz ....................................................851 MHz - 868.945 MHz .............................................896 MHz - 1300 MHz - 1300 MHz ...................................................5 kHz, 12.5 kHz, 50 kHz .........................................Wide FM, (TV sound, FM broadcast) ...........................Narrow FM (Business, communications, ham radio) ...................................................AM (Aircraft, CB radio) ................................Any 400 channels in any band combinations. .......................................(40 channels x 10 Monitor channels) ......................................WFM: 30 dB S/N at 22.5 kHz deviation .....................................................25 MHz - 520 MHz 3 uV ........................................760 MHz - 1100 MHz - 1300 MHz 3 uV AM:20 dB S/N at 60% modulation .....................................................25 MHz - 520 MHz 2 uV ..................................................1100 MHz - 1300 MHz 5 uV ...................................................610 MHz AT 70 MHz 60 Db .................................................608 MHz at 1000 MHz 60 dB ................................................................NFM and AM ..........................................................+/- 9 kHz, -6 dB .......................................................+/- 15 kHz, -50 dB .......................................................................WFM .........................................................+/_150 kHz, -6 dB ........................................................+/- 300 kHz,_50 dB ......................................................Fast 26 Channels/sec ......................................................slow 13 channels/sec .................................................................2 seconds .................................................................2 seconds ................................................................NFM and AM ........................................Threshold 25 MHz - 520 MHz 0.5 uV .................................................760 MHz - 1100 MHz 0.5 uV .................................................1100 MHz - 1300 MHz 40 dB ....................................................Tight S/N 25 MHz-25 dB ........................................................760MHz - 1100 MHz .................................................1100 MHz - 1300 MHz 20 dB .......................................................................WFM .....................................................Threshold 25 MHz 3 uV ..................................................760 MHJz - 1100 MHz 3 uV .................................................1100 MHz - 1300 MHz 15 uV ..........................................Tight S/N 25 MHz - 520 MHz 40 dB ..................................................760 MHz - 1100 MHz 40 dB ...................................................................50 ohms .........................................................1.3 watts nominal ............................................3" (77 mm) 8 ohms,dynamic type ............................................................600 mV nominal ................................................AC 120 Volts 60 Hz 8 watts ....................................................DC 13.8 Volts 10 watts DC Adapter.......................................................270-1534B ...................................................................9 Volts .........................2 7/8" (76 mm) x 8-/8" (220 mm) x 8 1/4" (205 mm) .......................................................................HWD ..........................................................77.6 oz (2.2 kg) Specifications are typical; individual units might vary. Specifications are subject to change without notice. (please look at our rules and privacy policy) |
Nell-Barnett@machine--tools.com (Nell Barnett) for additional information. This email is used for forwarding to newsgroup user.